Your Keto Plan is Ready! Click Here →

Advertisements

Keto Strawberry Cream Cheese Cobbler Recipe

1. Introduction

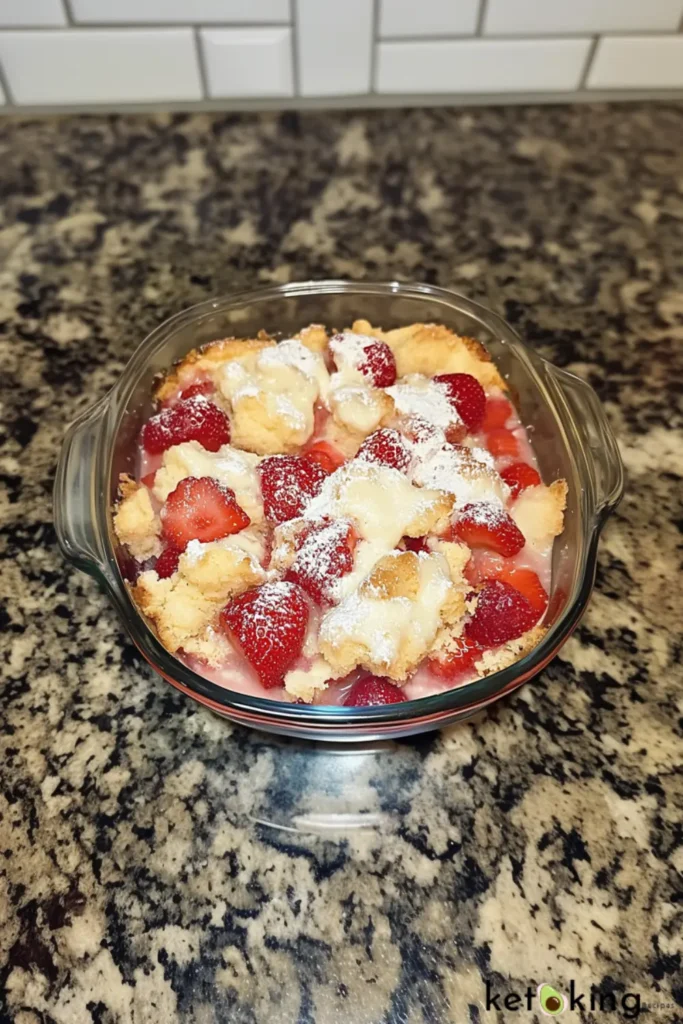
If you’re on a keto journey but find yourself craving something sweet, you’re in for a real treat! This Keto Strawberry Cream Cheese Cobbler brings all the warmth and nostalgia of home-baked desserts without the guilt. I remember the days when my grandmother would whip up a cobbler on warm summer evenings, filling the air with the sweet aroma of fresh strawberries.

Keto Strawberry Cream Cheese Cobbler

This recipe captures that essence, offering a delightful dessert that’s creamy, fruity, and absolutely satisfying. The combination of tangy cream cheese with luscious strawberries creates a unique flavor profile that you’ll want to savor again and again.

2. Why Make This Recipe?

There are countless reasons to make this Keto Strawberry Cream Cheese Cobbler, but here are just a few:

  • Easy and Quick: With a handful of simple ingredients, you can whip this dessert up in no time.
  • Budget-Friendly: All the ingredients are readily available and won’t break the bank.
  • Family Favorite: This dish is sure to please everyone at the dinner table, regardless of their dietary preferences.
  • Healthy Option: Stick to your keto lifestyle while enjoying a delicious treat!

3. How to Make Keto Strawberry Cream Cheese Cobbler

Ingredients

Keto Lemon Cream Cheese Coffee Cake

This rich and zesty Keto Lemon Cream Cheese Coffee Cake is the perfect low-carb treat to enjoy with your morning coffee or as a light dessert. Moist almond flour cake, a creamy lemon filling, and a buttery crumble topping make every bite irresistible—without the carbs.
Course Dessert
Cuisine American
Servings 12
Calories 280 kcal

Equipment

  • Mixing bowls
  • Electric mixer or whisk
  • 9-inch round baking pan
  • Measuring cups and spoons
  • Spatula
  • Oven

Ingredients
  

  • Ingredients
  • For the Cake Batter:
  • 2 ½ cups almond flour
  • ½ cup granulated erythritol
  • 2 tsp baking powder
  • ¼ tsp salt
  • 3 large eggs
  • ½ cup unsweetened almond milk
  • ¼ cup melted unsalted butter
  • 1 tbsp lemon zest
  • 2 tbsp fresh lemon juice
  • 1 tsp vanilla extract
  • For the Cream Cheese Filling:
  • 8 oz cream cheese softened
  • ¼ cup granulated erythritol
  • 1 large egg
  • 1 tsp vanilla extract
  • 1 tbsp fresh lemon juice
  • For the Crumble Topping:
  • ¾ cup almond flour
  • ¼ cup granulated erythritol
  • ¼ cup cold unsalted butter diced
  • 1 tsp lemon zest

Instructions
 

  • Instructions
  • Preheat oven to 175°C (350°F). Line and grease a 9-inch round baking pan.
  • Cream Cheese Filling: In a bowl, beat together cream cheese, erythritol, egg, vanilla, and lemon juice until smooth. Set aside.
  • Cake Batter: In a large bowl, whisk almond flour, erythritol, baking powder, and salt. In another bowl, combine eggs, almond milk, melted butter, lemon zest, lemon juice, and vanilla. Mix wet into dry until combined.
  • Assemble: Spread half the cake batter into the pan. Layer the cream cheese mixture on top, then the remaining batter.
  • Crumble Topping: Combine almond flour, erythritol, lemon zest, and diced cold butter until crumbly. Sprinkle over the cake.
  • Bake for 35–40 minutes, or until golden and a toothpick comes out clean. Cool completely before slicing.

Notes

Store leftovers in the fridge for up to 5 days.
Great with whipped cream or a dusting of powdered keto sweetener.
To make it nut-free, try sunflower seed flour as an almond flour substitute (1:1 ratio).
Keyword sugar-free dessert
Keto Strawberry Cream Cheese Cobbler

Directions

  1. Preheat your oven to 350°F (175°C).
  2. In a mixing bowl, beat the softened cream cheese with the sweetener until smooth.
  3. Add the eggs one at a time, mixing well after each addition.
  4. Stir in the vanilla extract, almond flour, baking powder, and salt until fully combined.
  5. Gently fold in the sliced strawberries.
  6. Pour the mixture into a greased baking dish.
  7. Bake for 30-35 minutes or until the top is golden brown and set.
  8. Let it cool slightly before serving. Enjoy your Keto Strawberry Cream Cheese Cobbler!

4. How to Serve Keto Strawberry Cream Cheese Cobbler

Here are a few ideas for how to enjoy your Keto Strawberry Cream Cheese Cobbler:

  • Serve warm with a dollop of whipped cream or a scoop of sugar-free vanilla ice cream.
  • Pair it with a light, refreshing salad for a balanced meal.
  • Enjoy it with a hot cup of coffee or a chilled glass of herbal tea for a delightful dessert experience.

5. How to Store Keto Strawberry Cream Cheese Cobbler

To keep your cobbler fresh:

  • Refrigeration: Store leftover cobbler in an airtight container in the refrigerator for up to 3 days.
  • Freezing: If you want to preserve it longer, you can freeze it for up to a month. Just make sure it’s tightly wrapped to avoid freezer burn.
  • Reheating: To reheat, simply warm slices in the microwave or bake in the oven at 350°F (175°C) for about 10-15 minutes.

6. Tips to Make Keto Strawberry Cream Cheese Cobbler Perfectly

Here are some extra tips for improving this recipe:

  • Enhance flavor: Add a pinch of cinnamon or nutmeg for an extra flavor dimension.
  • Avoid common mistakes: Ensure the cream cheese is at room temperature to prevent lumps.
  • Cooking techniques: For the best texture, don’t overmix the batter once you add the strawberries; folding gently is key.
  • Adjust sweetness: Taste the mixture before baking and adjust the sweetener to your preference.

7. Variations

Feel free to experiment with these alterations:

  • Vegan Version: Substitute cream cheese with a vegan cream cheese alternative and use flax eggs or applesauce in place of the eggs.
  • Gluten-Free: Ensure your almond flour is certified gluten-free and you’re good to go!
  • Low-Carb Modifications: Adjust the sweetener to fit your carb requirements, using options like monk fruit or allulose.

8. Frequently Asked Questions (FAQ)

Here are some common questions regarding the Keto Strawberry Cream Cheese Cobbler:

  • Can I make Keto Strawberry Cream Cheese Cobbler ahead of time?
  • Yes, you can prepare it a day in advance and store it in the refrigerator until serving.
  • What are the best substitutes for almond flour?
  • You can use coconut flour, but remember to adjust the quantity, as it absorbs more moisture.
  • Can I cook this recipe in an air fryer?
  • Yes, you can. Adjust the temperature to 320°F and check for doneness around the 20-minute mark.

9. Conclusion

This Keto Strawberry Cream Cheese Cobbler recipe is not just a delicious dessert, but a slice of nostalgia that brings comfort and joy. Its creamy texture and sweet strawberry flavor make it a perfect treat that aligns with your keto lifestyle. We encourage you to try this recipe and taste the delightful combination of flavors and textures. If you enjoy it, please leave a comment, rate the recipe, or share your experience on social media! Happy baking!

Keto Crack Toffee Bars

Keto Crack Toffee Bars

1. Introduction

Have you ever found a dessert that takes you on a nostalgic journey? The moment you take a bite of Keto Crack Toffee Bars, you’re transported to those cozy family nights filled with laughter and unforgettable movie marathons. This recipe is not just any treat; it’s a delightful combination of sweet and salty, crunchy and indulgent—all while being guilt-free! Imagine the rich, buttery flavor complemented by the creamy chocolate and a hint of vanilla. You won’t just be making a dessert; you’ll be creating memories.

2. Why Make This Recipe?

Here are a few compelling reasons to whip up these delicious bars:

  • Easy and Quick to Make: This recipe requires minimal effort and time; perfect for when you’re craving something sweet but don’t want to spend hours in the kitchen.
  • Budget-Friendly: With affordable ingredients, these bars won’t break the bank, making them great for any occasion.
  • Family Favorite: Everyone—from kids to adults—loves them! They’re an excellent treat for family gatherings or just a Friday night in.
  • Healthy or Diet-Friendly: Being keto-friendly, they fit perfectly into your low-carb lifestyle, allowing you to indulge without the guilt.

3. How to Make Keto Crack Toffee Bars

Ingredients:

  • For the crust:

    • 150g almond flour (1½ cups)

    • 60g butter, melted (¼ cup)

    • 2 tablespoons powdered sweetener (erythritol or monk fruit)

    • ¼ teaspoon salt

    • ½ teaspoon vanilla extract

  • For the toffee layer:

    • 120g butter (½ cup)

    • 100g powdered sweetener (½ cup, erythritol or monk fruit blend)

    • ½ teaspoon vanilla extract

    • Pinch of salt

  • For the topping:

    • 150g sugar-free chocolate chips or chopped dark chocolate

    • 50g chopped pecans or almonds (optional)


Directions:

Step 1: Prepare Crust

  • Preheat your oven to 180°C (350°F).

  • Line a baking pan (20×20 cm or 8×8 inch) with parchment paper.

  • In a bowl, mix almond flour, melted butter, sweetener, vanilla, and salt until crumbly and evenly combined.

  • Press this mixture evenly into your prepared pan. Bake for 12-15 minutes until lightly golden.

Step 2: Make Toffee Layer

  • While crust bakes, in a saucepan, melt butter over medium heat. Add powdered sweetener, vanilla, and salt.

  • Cook for about 3-5 minutes, stirring continuously until bubbling and golden brown (be careful not to burn it).

  • Immediately pour the toffee evenly over the baked crust.

Step 3: Chocolate Topping

  • Sprinkle chocolate chips (or chopped dark chocolate) immediately over the hot toffee layer. Allow to melt for about 2 minutes, then gently spread the chocolate evenly using a spatula.

  • Sprinkle chopped nuts over the chocolate, if using.

Step 4: Chill and Serve

  • Chill in the fridge for at least 1 hour until set and firm.

  • Cut into bars, serve cold, and enjoy!

4. How to Serve Keto Crack Toffee Bars

Elevate your dessert experience with these serving ideas:

  • Serve alongside a scoop of low-carb ice cream for an extra creamy texture.
  • Pair with a cup of rich coffee or tea to balance the sweetness.
  • Present on a beautiful platter, garnished with a sprinkle of sea salt or chopped nuts for an elegant touch.

5. How to Store Keto Crack Toffee Bars

To ensure your bars stay fresh:

  • Storage: Keep them in an airtight container in the refrigerator for up to a week.
  • Freezing: You can freeze the bars for up to 3 months. Cut them into squares, wrap them individually, and place them in a freezer-safe bag.
  • Reheating: Let them thaw at room temperature. For a warm treat, place them in the microwave for a few seconds.

6. Tips to Make Keto Crack Toffee Bars Perfectly

  • Enhancing Flavor: Add a splash of coffee or a dash of cinnamon to deepen the flavor profile.
  • Avoiding Common Mistakes: Make sure not to overcook the bars; keep an eye on them as they bake.
  • Best Texture: Allow the bars to cool completely; this helps achieve that crunchy yet chewy consistency.
  • Chocolate Tip: Try melting the chocolate chips in a double boiler for a smoother finish before spreading them over the bars.
  • Experimenting: Feel free to add chopped nuts or dried fruit for added texture and flavor.

7. Variations (If Any)

Here are some alternative variations to consider:

  • Vegan Version: Substitute butter with coconut oil and use a plant-based sweetener.
  • Gluten-Free Adaptation: The almond flour already makes this recipe gluten-free; just double-check your chocolate chips.
  • Low-Carb Modifications: Experiment with different low-carb sweeteners to find the perfect balance for your palette.

8. Frequently Asked Questions (FAQ)

  • Can I make Keto Crack Toffee Bars ahead of time?
    Yes, you can prepare them a day in advance. Just store them in an airtight container in the fridge.
  • What are the best substitutes for erythritol?
    You can use stevia or monk fruit sweetener as alternatives; adjust the quantity to taste.
  • Can I cook this recipe in an air fryer?
    Yes, you can! Just adjust the cooking time, as air fryers vary in performance. Start with 10-15 minutes and check for doneness.

9. Conclusion

Indulging in Keto Crack Toffee Bars doesn’t have to derail your healthy lifestyle. With simple ingredients and easy steps, you can create a dessert that’s not only delicious but also fulfilling. So why not try making these bars today? Share your experience in the comments below, and don’t forget to rate the recipe! Happy baking!

Keto Snickerdoodles: Delicious, Low-Carb, and Guilt-Free

Keto Snickerdoodles

Introduction: Satisfy Your Sweet Tooth Without Guilt

Craving something sweet but want to stay true to your keto lifestyle? You’re not alone. Many people find themselves missing those beloved, sugary treats after starting a low-carb or ketogenic diet. The good news is, with a few smart ingredient swaps, you don’t have to give up the joy of baking (or eating) cookies.

Keto Snickerdoodles

Keto Snickerdoodles are the perfect solution to your sweet cravings. Soft, chewy, and spiced with cinnamon, these cookies offer all the comfort and nostalgia of traditional snickerdoodles, without the carbs. Whether you’re looking for a quick treat or something to serve at a gathering, Keto Snickerdoodles are sure to impress—and keep you on track with your diet goals.

In this ultimate guide, we’ll explore everything you need to know about making Keto Snickerdoodles, including essential ingredients, tips for perfection, variations, and much more. By the end, you’ll have the confidence to make the perfect batch of keto-friendly snickerdoodle cookies every time.

Why Keto Snickerdoodles Are the Perfect Dessert for You

Before diving into the recipe and preparation process, let’s take a moment to highlight why Keto Snickerdoodles are an excellent choice for your low-carb diet.

1. Low-Carb and Keto-Friendly

Traditional snickerdoodle cookies are often loaded with refined sugars and high-carb flour. However, Keto Snickerdoodles are made using low-carb ingredients such as almond flour and sugar substitutes. This makes them ideal for anyone following a keto, low-carb, or gluten-free diet, allowing you to indulge without the guilt.

2. Nostalgic and Comforting Flavours

There’s something about a warm, cinnamon-sugar cookie that brings comfort and nostalgia. The familiar taste of snickerdoodles can instantly take you back to childhood memories of baking with loved ones. With Keto Snickerdoodles, you don’t have to miss out on that feeling. The cinnamon-sugar coating combined with the soft, chewy texture will satisfy your sweet cravings in a healthier way.

3. Easy to Make

Keto Snickerdoodles are surprisingly easy to prepare. With just a few simple ingredients and minimal effort, you can whip up a batch of cookies that are both delicious and low in carbs. Whether you’re a baking pro or a beginner, these cookies will quickly become a go-to recipe.

4. Perfect for Sharing

Whether you’re hosting a party, attending a gathering, or simply want to share your keto-friendly creations with others, Keto Snickerdoodles are sure to be a hit. They offer the sweetness and comfort of traditional cookies, making them an easy crowd-pleaser—especially for those who follow low-carb or keto diets.

What You Need to Make Keto Snickerdoodles

Key Ingredients for Keto Snickerdoodles

Before you start baking, it’s important to gather the right ingredients. Here’s a breakdown of what you’ll need for Keto Snickerdoodles:

IngredientAmountNotes
Almond Flour2 cupsProvides a gluten-free, low-carb base for the cookies
Butter (Softened)½ cupAdds richness and helps create the soft texture of the cookies
Erythritol (or Stevia)¾ cupA keto-friendly sweetener that replaces traditional sugar
Egg1 largeProvides structure and helps bind the dough together
Baking Soda½ tspHelps the cookies rise and become light and fluffy
Cream of Tartar1 tspGives the cookies their signature tangy flavour
Cinnamon1 tbspEssential for that classic snickerdoodle taste
Vanilla Extract1 tspAdds flavour depth and sweetness to the dough
Salt¼ tspBalances the sweetness and enhances the flavours
Keto Snickerdoodles

Tools You’ll Need

  • Mixing Bowls: For combining the dry and wet ingredients.
  • Hand Mixer or Stand Mixer: For easy mixing and to ensure the dough is well-blended.
  • Baking Sheet: To bake the cookies evenly.
  • Parchment Paper or Silicone Baking Mat: To prevent the cookies from sticking and ensure easy removal.
  • Cookie Scoop or Tablespoon: To portion out the dough into evenly sized balls.

Step-by-Step Guide to Making Keto Snickerdoodles

1. Prepare the Dough

  • Preheat the Oven: Start by preheating your oven to 350°F (175°C) to ensure it’s at the right temperature for baking.
  • Mix Wet Ingredients: In a large mixing bowl, cream together the softened butter and erythritol until smooth and fluffy. Add in the egg and vanilla extract, mixing until everything is well combined.
  • Combine Dry Ingredients: In another bowl, whisk together the almond flour, baking soda, cream of tartar, and salt. Gradually add the dry ingredients to the wet ingredients, stirring until the dough forms.

2. Shape the Cookies

  • Form Dough Balls: Use a cookie scoop or tablespoon to scoop out portions of dough. Roll each portion into a ball using your hands to ensure uniform size.
  • Cinnamon-Sugar Coating: In a small bowl, mix cinnamon and erythritol. Roll each dough ball in this cinnamon-sugar mixture, coating them thoroughly.

3. Bake the Cookies

  • Place on a Baking Sheet: Arrange the coated dough balls on a baking sheet lined with parchment paper, spacing them about 2 inches apart to allow for expansion.
  • Bake the Cookies: Bake for 10-12 minutes, or until the edges are golden and the centers are set. Keep an eye on them, as they can bake quickly.

4. Cool and Enjoy

  • Let Them Cool: After baking, allow the cookies to cool on the baking sheet for a few minutes. Then, transfer them to a wire rack to cool completely before serving.

Tips for Perfect Keto Snickerdoodles Every Time

  • Use Softened Butter: Softened butter helps the dough mix more easily and ensures a smoother, softer cookie.
  • Don’t Overmix the Dough: Overmixing can lead to dense cookies. Mix just until everything is combined for the best texture.
  • Chill the Dough (Optional): If you have time, chilling the dough for 30 minutes before baking helps the cookies hold their shape and prevents them from spreading too much.
  • Check the Cookies Early: Since ovens vary, check your cookies a minute or two before the suggested time to avoid overbaking.

Variations of Keto Snickerdoodles

Keto Snickerdoodles are delicious on their own, but you can also customize them to suit your tastes. Here are some fun variations to try:

1. Keto Snickerdoodle Bars

Instead of shaping the dough into cookies, press it into a greased 9×9 baking dish. Bake for 20-25 minutes, then cut into squares. These bars are perfect for sharing at parties or gatherings.

2. Add Sugar-Free Chocolate Chips

For a chocolatey twist, stir in some sugar-free chocolate chips into the dough before baking. The chocolate will melt into the cookie, adding a rich, indulgent flavour.

3. Make It Dairy-Free

Substitute the butter with a dairy-free alternative like coconut oil or vegan butter. This will make the recipe suitable for those on a dairy-free or vegan diet.

4. Add Nuts or Seeds

For added texture, you can mix in chopped nuts like pecans, walnuts, or even chia seeds to the dough before baking.

Health Benefits of Keto Snickerdoodles

While traditional snickerdoodles are loaded with sugar and carbs, Keto Snickerdoodles offer a healthier alternative with the following benefits:

1. Low in Carbs

With almond flour as the base and erythritol as the sweetener, Keto Snickerdoodles are low in carbohydrates, making them perfect for anyone on a keto, low-carb, or diabetic-friendly diet.

2. Gluten-Free

By using almond flour instead of wheat flour, these cookies are naturally gluten-free, making them suitable for those with gluten sensitivities or celiac disease.

3. High in Healthy Fats

The butter and almond flour provide healthy fats, which are beneficial for supporting your metabolism and keeping you satisfied.

4. Rich in Fiber

Almond flour is a good source of fiber, which aids digestion and helps maintain stable blood sugar levels, making these cookies a more nutritious choice.


Frequently Asked Questions (FAQs) About Keto Snickerdoodles

Can I use coconut flour instead of almond flour?

Yes, but you’ll need to adjust the quantity. Coconut flour is more absorbent than almond flour, so use 1/4 to 1/3 of the amount of coconut flour and increase the liquids slightly to maintain the dough consistency.

Can I make these cookies without cream of tartar?

While cream of tartar gives Keto Snickerdoodles their classic tang, you can omit it if needed. The cookies will still taste great, but they may lose some of the signature flavour.

Can I use a different sweetener instead of erythritol?

Yes, you can substitute erythritol with other keto-friendly sweeteners such as monk fruit or stevia. Just adjust the quantity according to the sweetness of your chosen sweetener.

How do I store Keto Snickerdoodles?

Store your cookies in an airtight container at room temperature for up to 1 week. You can also freeze them for up to 2 months. Thaw at room temperature when ready to enjoy.


Conclusion: Enjoy Your Guilt-Free Keto Snickerdoodles

Keto Snickerdoodles are the perfect solution to your sweet cravings while maintaining your low-carb lifestyle. With the right ingredients and simple steps, you can enjoy this classic cookie in a way that fits your dietary needs. Whether you’re baking for yourself or sharing with friends and family, these cookies will surely become a beloved treat in your kitchen.


Call-to-Action:
Ready to try making Keto Snickerdoodles? Gather your ingredients and start baking today! Once you’ve baked your first batch, let us know how they turned out and share your favourite variations of this keto treat with us!

Keto Cinnamon Roll Scones

Keto Cinnamon Roll Scones

1. Introduction

Ah, the sweet aroma of cinnamon rolls wafting through the kitchen! If you’ve ever craved that delightful scent but were worried about your keto diet, then you’re in luck. These Keto Cinnamon Roll Scones are your answer to satisfying that sweet tooth without straying from your low-carb lifestyle.

Keto Cinnamon Roll Scones

Imagine biting into a warm, soft scone that perfectly balances the richness of cinnamon and the sweetness of a mindful sweetener. They offer a comforting texture and a unique flavor that will transport you back to your favorite bakery, all while being perfectly keto-friendly.

2. Why Make This Recipe?

Here are a few compelling reasons why these Keto Cinnamon Roll Scones should be on your radar:

  • Easy and Quick to Make: With minimal preparation and cooking time, you’ll have warm scones in no time!
  • Budget-Friendly: Using common ingredients, you can whip up these treats without breaking the bank.
  • Family Favorite: Whether you’re keto or not, these scones are bound to please everyone at your table.
  • Healthy or Diet-Friendly: Low in carbohydrates and sugar, these scones fit perfectly into your healthy eating plan.

3. How to Make Keto Cinnamon Roll Scones

Ingredients

Here’s everything you’ll need to create these delicious scones:

IngredientQuantityNotes
Almond Flour2 cupsFinely blanched almond flour
Coconut Flour2 tbspAdds texture and firmness
Baking Powder1 tbspGives scones a light rise
Erythritol (granulated)⅓ cupOr your preferred keto sweetener
Ground Cinnamon1 tbspFor that cinnamon roll flavour
Butter (cold, cubed)6 tbspUnsalted, keep cold for flaky texture
Eggs2Medium or large
Heavy Cream¼ cupCan substitute with coconut cream if dairy-free
Vanilla Extract1 tspAdds classic scone aroma and flavour
Optional: Chopped Pecans¼ cupAdds crunch and nutty flavour

Cream Cheese Icing (Optional)

IngredientQuantityNotes
Cream Cheese2 ozSoftened
Powdered Erythritol2 tbspAdjust to your sweetness preference
Heavy Cream1 tbspTo thin the icing slightly
Vanilla Extract½ tspEnhances sweetness and depth
Keto Cinnamon Roll Scones

Directions

Follow these straightforward steps to bring your scones to life:

  1. Preheat your oven to 350°F (175°C).
  2. In a large mixing bowl, combine the almond flour, coconut flour, baking powder, cinnamon, and sweetener.
  3. In a separate bowl, melt the butter and let it cool slightly. Then, whisk in the eggs and vanilla extract until well blended.
  4. Pour the wet ingredients into the dry ingredients and stir until a dough forms.
  5. Shape the dough into scones and place them on a baking tray lined with parchment paper.
  6. Bake for 15-20 minutes, or until the scones are golden brown and fragrant.
  7. For an optional icing, mix the cream cheese with your choice of sweetener and spread it over the warm scones.
  8. Serve warm and enjoy these delicious keto treats!

4. How to Serve Keto Cinnamon Roll Scones

These scones are delightful on their own, but here are a few serving ideas that will elevate your experience:

  • With Fresh Berries: Pair them with a side of fresh raspberries or strawberries for a refreshing contrast.
  • Coffee or Tea: Enjoy your scones with a steaming cup of coffee or herbal tea to complement the flavors.
  • Presentation Tip: Serve them on a rustic wooden board, drizzled with icing for a beautiful display that’s sure to impress.

5. How to Store Keto Cinnamon Roll Scones

To keep your Keto Cinnamon Roll Scones delicious for days, follow these storage tips:

  • Refrigeration: Store in an airtight container in the fridge for up to 5 days.
  • Freezing: For longer storage, freeze the scones in a single layer, then transfer to a freezer bag for up to 3 months.
  • Reheating: To enjoy, simply reheat in the oven at 350°F (175°C) for about 5-10 minutes until warmed through.

6. Tips to Make Keto Cinnamon Roll Scones Perfectly

Want to ensure your scones turn out flawlessly? Here are some expert tips:

  • Enhance Flavor: Consider adding some chopped nuts or making a spiced icing for extra flavor.
  • Avoid Common Mistakes: Don’t overmix the dough; this can lead to tough scones. Mix just until combined.
  • Cooking Technique: Make sure your butter is melted, but not hot. This will prevent the eggs from cooking too quickly when mixed.
  • Texture: For softer scones, try using a pastry cutter when combining dry and wet ingredients.

7. Variations (If Any)

Feeling adventurous? Here are some variations of the Keto Cinnamon Roll Scones you can try:

  • Vegan Version: Substitute eggs with flax eggs or chia seeds mixed with water to make a vegan-friendly treat.
  • Gluten-Free Adaptation: Already gluten-free, just make sure all your ingredients are certified gluten-free.
  • Low-Carb Modifications: Adjust your sweeteners based on personal taste preferences to keep it low-carb.

8. Frequently Asked Questions (FAQ)

Here are some common questions you might have regarding this recipe:

  • Can I make Keto Cinnamon Roll Scones ahead of time?
    Yes, you can prepare the dough and store it in the fridge overnight before baking.
  • What are the best substitutes for almond flour?
    For best results, you can substitute with sunflower seed flour or a blend of coconut flour and flaxseed meal.
  • Can I cook this recipe in an air fryer?
    Absolutely! Air fry for about 10-12 minutes or until golden brown at 320°F (160°C).

9. Conclusion

These Keto Cinnamon Roll Scones are a delicious way to enjoy a sweet treat without straying from your diet. They’re quick to whip up and perfect for any occasion. I encourage you to give this recipe a try, and share your experience with friends and family! Don’t forget to leave a comment or rate the recipe. Happy baking!

Peanut Butter Brownie

Peanut Butter Brownie

Introduction

Do you recall the delightful sensation of biting into a soft, warm brownie only to be greeted by the rich, creamy swirl of peanut butter? Peanut butter brownies aren’t just desserts; they’re memories wrapped in chocolate and peanut butter, bringing warmth and comfort with every bite.

Peanut Butter Brownie

Let’s dive deeper into creating the ultimate peanut butter brownie and explore the secrets behind making them perfectly delicious every single time.

What Makes a Peanut Butter Brownie Special?

Peanut butter brownies stand out because of their irresistible combination of rich chocolate and creamy peanut butter. This pairing creates a unique texture and taste, enhancing the overall brownie experience.

  • Uniqueness: Combines the richness of chocolate with the creamy, salty-sweet taste of peanut butter.
  • Perfect Complement: Peanut butter balances the sweetness of chocolate, adding depth to the flavor.
  • Compared to Traditional Brownies: Offers added protein and healthy fats, elevating the dessert both nutritionally and taste-wise.

Health and Nutritional Insights of Peanut Butter Brownies

Though indulgent, peanut butter brownies can provide nutritional benefits if consumed in moderation:

  • Protein and Healthy Fats: Peanut butter is rich in protein and healthy fats, providing energy and satiety.
  • Vitamins and Minerals: Includes beneficial nutrients like Vitamin E, magnesium, and potassium.
  • Moderation is Key: While delicious, they should be enjoyed as an occasional treat.

Nutritional Comparison (Per Serving):

NutrientTraditional BrowniePeanut Butter Brownie
Calories230250
Fat10g14g
Sugar20g18g
Protein3g6g

Key Ingredients for the Perfect Peanut Butter Brownie

Brownie Batter Ingredients

  • Cocoa powder
  • All-purpose flour
  • Granulated sugar
  • Melted butter
  • Eggs

Peanut Butter Swirl Ingredients

  • Natural creamy peanut butter
  • Powdered sugar
  • Pure vanilla extract

Ingredients Table:

IngredientAmount
Cocoa Powder½ cup
All-Purpose Flour1 cup
Granulated Sugar1½ cups
Butter½ cup melted
Eggs3 large
Natural Peanut Butter¾ cup
Powdered Sugar¼ cup
Vanilla Extract1 tsp

Step-by-Step Guide to Making Delicious Peanut Butter Brownies

Preparing the Brownie Batter

  1. Preheat your oven to 350°F (175°C).
  2. Combine cocoa powder, flour, and granulated sugar in a bowl.
  3. Stir in melted butter and eggs until you achieve a smooth, thick batter.

Creating the Peanut Butter Swirl

  1. In another bowl, mix peanut butter, powdered sugar, and vanilla extract until creamy.
  2. Drop spoonfuls of the peanut butter mixture onto the brownie batter.
  3. Use a knife or skewer to gently swirl the peanut butter mixture into the brownie batter.

Baking and Serving Your Brownies

  1. Bake in the preheated oven for approximately 25-30 minutes or until just set.
  2. Allow brownies to cool before cutting them into squares.

Tips for Making Perfect Peanut Butter Brownies

  • Choose Natural Peanut Butter: Provides better taste and consistency without extra sugars.
  • Perfect Brownie Texture: Avoid overmixing batter to keep brownies soft and chewy.
  • Swirling Technique: Gentle swirling creates a beautiful marbled effect without mixing the layers completely.

Serving Suggestions and Storage Recommendations

  • Serving Ideas: Serve warm with ice cream, chilled with whipped cream, or simply as-is.
  • Storage Tips: Store brownies in airtight containers at room temperature for up to three days, or refrigerate for extended freshness. Freeze individually wrapped brownies for longer storage.

Common Mistakes When Baking Peanut Butter Brownies

  • Overmixing Batter: Results in tougher brownies due to gluten development.
  • Incorrect Oven Temperature: Causes uneven baking and texture issues.
  • Sweetened Peanut Butter: Can alter taste and sweetness balance unintentionally.

Peanut Butter Brownie FAQ

How do you store peanut butter brownies?

  • Store brownies in airtight containers at room temperature for short periods or refrigerate for longer freshness. For extended storage, freezing is ideal.

Can peanut butter brownies be frozen?

  • Yes, freeze individual squares wrapped in plastic and aluminum foil. To thaw, leave them at room temperature for a few hours or warm them briefly in the oven.

What’s the best peanut butter to use for peanut butter brownies?

  • Natural, creamy peanut butter without added sugar or oils is ideal for authentic taste and healthier results.

Conclusion

Peanut butter brownies capture the heart with their perfect balance of sweet chocolate and salty peanut butter. By following this easy-to-master recipe and helpful tips, you can consistently bake brownies that your family and friends will love. So, why wait? It’s time to indulge yourself and your loved ones—start baking your perfect peanut butter brownies today!

Keto Peanut Butter Brownie Tart

Keto Peanut Butter Brownie Tart

Introduction

Have you found yourself longing for indulgent desserts while sticking to your keto lifestyle? You’re not alone. Many people, myself included, often feel a sense of loss when favorite treats like rich, chocolaty brownie tarts become off-limits.

Keto Peanut Butter Brownie Tart

The Keto Peanut Butter Brownie Tart came into my life as a delightful surprise, delivering the decadent combination of chocolate and peanut butter without sacrificing my keto goals.

What is a Keto Peanut Butter Brownie Tart?

A Keto Peanut Butter Brownie Tart is a luscious dessert crafted specifically to fit a ketogenic diet, offering all the deliciousness of traditional brownie tarts but with significantly fewer carbs and sugars. It differs from traditional versions mainly in its ingredient choices, replacing high-carb ingredients like wheat flour and refined sugars with almond flour, natural sweeteners, and high-quality fats. This keto adaptation allows you to enjoy dessert without jeopardizing ketosis or your dietary discipline.

Benefits of Enjoying Keto Peanut Butter Brownie Tart

Enjoying a Keto Peanut Butter Brownie Tart isn’t just about taste; it also supports your health and dietary goals:

  • Low in Carbohydrates and Sugar: Keeps blood sugar stable, ideal for maintaining ketosis.
  • Rich in Healthy Fats and Proteins: Helps you feel satisfied longer, reducing cravings.
  • Supports Weight Management: Facilitates fat-burning through keto-friendly macros.
  • Suitable for Diabetic and Gluten-Free Diets: Safe dessert alternative for those managing diabetes or gluten intolerance.

Nutritional Comparison (per serving)

NutrientTraditional TartKeto Tart
Carbohydrates40g6g
Sugars30g1g
Fats20g30g
Proteins5g10g

Essential Ingredients for Keto Peanut Butter Brownie Tart

Ingredients for Brownie Crust

  • Almond Flour
  • Cocoa Powder
  • Eggs
  • Butter or Coconut Oil
  • Keto-friendly Sweetener

Ingredients for Peanut Butter Filling

  • Natural Peanut Butter (unsweetened)
  • Cream Cheese
  • Keto-friendly Sweetener
  • Vanilla Extract

Ingredients Table:

IngredientAmount
Almond Flour1½ cups
Cocoa Powder⅓ cup
Eggs2 large
Butter/Coconut Oil¼ cup melted
Keto Sweetener½ cup
Natural Peanut Butter1 cup
Cream Cheese½ cup softened
Vanilla Extract1 tsp
Keto Peanut Butter Brownie Tart

Step-by-Step Guide to Making Keto Peanut Butter Brownie Tart

Preparing the Brownie Crust

  1. Preheat oven to 350°F (175°C).
  2. Combine almond flour, cocoa powder, and keto sweetener thoroughly.
  3. Add eggs and melted butter or coconut oil, mixing until a smooth dough forms.
  4. Press dough evenly into a greased tart pan.
  5. Bake for approximately 12-15 minutes until firm and allow to cool completely.

Making the Creamy Peanut Butter Filling

  1. In a mixing bowl, blend peanut butter, softened cream cheese, keto sweetener, and vanilla extract until smooth and creamy.
  2. Evenly spread the peanut butter mixture over the cooled brownie crust.

Setting and Serving Your Tart

  1. Refrigerate the assembled tart for at least 2 hours or until fully set.
  2. Slice the tart into even servings, garnish as desired, and serve chilled.

Expert Tips for the Best Keto Peanut Butter Brownie Tart

  • Perfect Brownie Texture: Don’t overmix the brownie batter to keep it tender.
  • Choosing Sweeteners: Opt for erythritol or monk fruit to avoid aftertaste and maintain consistency.
  • Selecting Peanut Butter: Always select unsweetened, natural peanut butter for a true keto option.

Serving Ideas and Storage Recommendations

  • Topping Suggestions: Enhance your tart with whipped cream, a drizzle of sugar-free chocolate, or crushed nuts.
  • Storage Tips: Keep the tart refrigerated in an airtight container to maintain freshness and texture for up to 5 days.

Common Mistakes to Avoid

  • Overbaking: Overbaking the crust can cause dryness—monitor closely during baking.
  • Using Sweetened Peanut Butter: Avoid hidden sugars; always read labels carefully.
  • Insufficient Chilling: Ensure adequate chilling time to achieve the perfect texture.

Keto Peanut Butter Brownie Tart FAQ

Can I freeze Keto Peanut Butter Brownie Tart? Absolutely! Wrap individual slices tightly in plastic wrap, then foil. Freeze for up to two months. Thaw slices overnight in the refrigerator before serving.

How long does Keto Peanut Butter Brownie Tart last in the refrigerator? When stored properly, your tart will remain fresh and tasty for up to five days.

Is Keto Peanut Butter Brownie Tart suitable for diabetics? Yes, thanks to its minimal carbohydrate content and absence of refined sugars, it’s an excellent choice for those managing diabetes. Always consult your healthcare provider for personalized dietary advice.

Conclusion

You deserve to enjoy indulgent desserts without compromising your keto goals. The Keto Peanut Butter Brownie Tart allows you to savor the rich flavors of peanut butter and chocolate guilt-free. Don’t wait—try making this decadent tart today and rediscover the joy of dessert within your dietary boundaries!

Keto Lemon Curd Tart

Keto Lemon Curd Tart

Introduction

Have you ever craved a refreshing, tangy dessert but felt restricted by your keto lifestyle? You’re not alone. Many keto dieters miss the vibrant flavours and textures of classic desserts like lemon curd tart.

Keto Lemon Curd Tart

Thankfully, you no longer have to deny yourself this indulgent pleasure. With this keto lemon curd tart recipe, you can satisfy your sweet cravings while staying firmly within your dietary goals.

What is a Keto Lemon Curd Tart?

A keto lemon curd tart is a delightful, low-carb version of the traditional dessert, specifically tailored for ketogenic diets. It features a buttery, gluten-free crust made from almond and coconut flours, filled with a rich and tangy lemon curd that replaces sugar with keto-friendly sweeteners. The result is a dessert that’s as delicious as the original but much healthier.

Health Benefits of Keto Lemon Curd Tart

Choosing a keto lemon curd tart doesn’t just taste good—it offers impressive health benefits:

  • Low sugar and carbs: Keeps you in ketosis, enhancing fat burning.
  • Rich in healthy fats: Provides sustained energy and helps manage hunger.
  • Packed with vitamin C: Boosts your immune system thanks to fresh lemons.
  • Diabetic and gluten-free friendly: Safe for individuals managing blood sugar and gluten sensitivities.

Key Ingredients for a Perfect Keto Lemon Curd Tart

Ingredients for Keto Tart Crust

  • Almond flour
  • Coconut flour
  • Butter or coconut oil
  • Keto-friendly sweetener (erythritol or stevia)
  • Egg

Ingredients for Keto Lemon Curd Filling

  • Fresh lemon juice and zest
  • Eggs
  • Butter
  • Keto-friendly sweetener

Ingredients Table:

IngredientAmount
Almond Flour1½ cups
Coconut Flour¼ cup
Butter/Coconut Oil⅓ cup
Keto Sweetener¼ cup
Egg1 large
Fresh Lemon Juice½ cup
Lemon Zest1 tbsp
Eggs (for curd)3 large
Butter (for curd)¼ cup
Keto Lemon Curd Tart

Step-by-Step Guide to Making Keto Lemon Curd Tart

Making the Keto Tart Crust

  1. Preheat your oven to 350°F (175°C) and lightly grease a tart pan.
  2. Combine almond flour, coconut flour, butter (or coconut oil), sweetener, and egg to form dough.
  3. Press dough evenly into the tart pan and bake for about 12-15 minutes or until golden brown.

Preparing Keto Lemon Curd Filling

  1. Whisk together lemon juice, zest, eggs, sweetener, and butter in a saucepan.
  2. Cook over medium heat, constantly stirring until the mixture thickens and coats the back of a spoon (approximately 8-10 minutes).
  3. Remove from heat and allow to cool slightly before filling your tart crust.

Assembling and Chilling Your Tart

  1. Pour the warm lemon curd into your cooled tart crust.
  2. Chill in the refrigerator for at least two hours to set.

Expert Tips for Perfect Keto Lemon Curd Tart

  • Ensure Smooth Curd Texture: Whisk constantly to prevent curdling and lumps.
  • Avoid a Soggy Crust: Blind bake the crust adequately and cool before filling.
  • Selecting and Zesting Lemons: Choose fresh, unwaxed lemons, and zest gently to avoid bitterness.

Serving Suggestions and Storage Tips

  • Garnishing Ideas: Top your tart with fresh berries, whipped cream, or mint leaves for an appealing presentation.
  • Storage Methods: Keep covered in the refrigerator for up to 5 days to retain freshness.
  • Serving Occasions: Perfect for brunches, tea times, special occasions, or everyday indulgence.

Common Mistakes to Avoid

  • Overcooking Lemon Curd: Leads to graininess; remove from heat as soon as it thickens.
  • Incorrect Measuring: Can affect texture—be precise with ingredient amounts.
  • Inadequate Chilling Time: Allow sufficient chilling to ensure the tart sets properly.

Keto Lemon Curd Tart FAQ

Can you freeze Keto Lemon Curd Tart? Yes, freeze individual slices wrapped securely. Thaw in the fridge overnight for the best results.

How long does Keto Lemon Curd Tart last in the fridge? Your tart remains fresh for up to 5 days when stored correctly in an airtight container.

Is Keto Lemon Curd Tart gluten-free? Absolutely! This recipe uses almond and coconut flours, ensuring it is entirely gluten-free.

Conclusion

A Keto Lemon Curd Tart lets you indulge in the tangy and creamy delight you’ve been missing without jeopardizing your keto goals. Easy to prepare and deliciously satisfying, it’s an ideal treat to enhance your keto diet. Why wait? Try this recipe today and experience the joy of guilt-free dessert!

Keto Nantucket Cranberry Pie

Keto Nantucket Cranberry Pie

Introduction

Imagine gathering around the table during a festive family dinner. The warm laughter and shared stories fill the room, and at the centre of it all—a delicious, comforting dessert. But wait, you’re on a keto diet. Does that mean you have to skip your favourite pie? Absolutely not! With Keto Nantucket Cranberry Pie,

Keto Nantucket Cranberry Pie

you can still indulge without sacrificing your dietary goals. This delectable pie offers the perfect balance of sweetness and tartness while keeping you firmly within your low-carb lifestyle.

What is Keto Nantucket Cranberry Pie?

Nantucket Cranberry Pie has its roots in traditional American baking, popular in the New England region, especially around holidays. Typically, it’s a buttery cake-like dessert filled with tart cranberries. Keto Nantucket Cranberry Pie adapts this classic favourite by substituting sugar and flour with keto-friendly alternatives, making it an excellent choice for anyone on a ketogenic diet.

Why Choose Keto?

  • Lower carbs and sugars
  • Rich in healthy fats
  • Supports dietary restrictions without sacrificing flavour

Benefits of Eating Keto Nantucket Cranberry Pie

This pie isn’t just delicious—it’s beneficial for your health, too:

  • Low in Carbohydrates: Ideal for keto or low-carb lifestyles.
  • Rich in Antioxidants: Cranberries offer excellent antioxidant properties, promoting overall health.
  • Supports Weight Management: High in healthy fats, it helps keep you full longer.
  • Regulates Blood Sugar: By replacing sugar with erythritol, it prevents blood sugar spikes.

Studies consistently highlight the benefits of a keto diet, including better heart health, weight loss, and improved blood sugar levels.

Ingredients for Keto Nantucket Cranberry Pie

IngredientQuantity
Fresh or frozen cranberries2 cups
Almond flour1 cup
Erythritol sweetener¾ cup
Eggs2 large
Butter (softened)½ cup
Vanilla extract1 teaspoon
Baking powder1 teaspoon
Salt¼ teaspoon
Chopped pecans (optional)¼ cup
Keto Nantucket Cranberry Pie

Step-by-Step Recipe: How to Make Keto Nantucket Cranberry Pie

Step 1: Prepare Ingredients and Preheat Oven

  • Preheat your oven to 350°F (175°C).
  • Lightly grease a pie dish or a round baking pan.

Step 2: Assemble the Pie Filling

  • Combine the cranberries with half of the sweetener and spread evenly across the bottom of your pie dish.

Step 3: Create the Keto Pie Batter

  • In a mixing bowl, whisk together almond flour, remaining sweetener, eggs, softened butter, vanilla extract, baking powder, and salt.
  • Blend until smooth and creamy.
  • Pour the batter evenly over the cranberry mixture in the pie dish.

Step 4: Bake the Pie

  • Bake in the preheated oven for 40-45 minutes or until the top is golden brown and a toothpick inserted in the centre comes out clean.
  • Allow the pie to cool before slicing and serving.

Tips and Tricks for Perfect Keto Nantucket Cranberry Pie

  • Cranberries: Fresh cranberries are best for flavour, but frozen cranberries work just as well. Do not thaw before baking.
  • Sweetness Adjustment: Adjust the erythritol amount depending on your sweetness preference.
  • Storage: Store your pie covered in the fridge for up to 5 days or freeze slices individually for longer preservation.

Serving Suggestions for Your Keto Nantucket Cranberry Pie

  • Serve with keto-friendly whipped cream or sugar-free vanilla ice cream.
  • Garnish with fresh mint leaves or drizzle with keto-friendly caramel sauce for added flair.

Nutritional Information

Each slice of your Keto Nantucket Cranberry Pie typically contains:

  • Calories: 215
  • Carbohydrates: 8g (net carbs approximately 4g)
  • Fat: 19g
  • Protein: 5g
  • Fibre: 4g

(Nutritional information calculated using standard keto nutritional tools.)

Frequently Asked Questions (FAQ) about Keto Nantucket Cranberry Pie

What Makes Keto Nantucket Cranberry Pie Keto-Friendly?

The use of almond flour and erythritol instead of wheat flour and sugar makes this pie low-carb, sugar-free, and suitable for ketogenic diets.

Can I Use Other Fruits in My Keto Nantucket Cranberry Pie?

Absolutely! Blueberries, raspberries, or even blackberries can replace cranberries if you prefer.

How Long Does Keto Nantucket Cranberry Pie Last?

Properly stored in the refrigerator, your pie will stay fresh for up to 5 days. You can freeze it for up to 2 months.

Conclusion

Keto Nantucket Cranberry Pie proves that being keto doesn’t mean missing out on beloved comfort foods. With this recipe, you can savour all the joy and sweetness of your favourite desserts while still adhering to your dietary goals. Go ahead, bake it today, and enjoy guilt-free indulgence!

Keto Key Lime Pie

Keto Key Lime Pie

Are you ready to indulge in a guilt-free dessert that will transport you straight to paradise? Imagine the zesty burst of key lime combined with a creamy filling, all nestled in a buttery almond crust.

Keto Key Lime Pie

This Keto Key Lime Pie is not just a treat for your taste buds; it’s a health-conscious dessert that fits perfectly into your low-carb lifestyle. Whether you’re reminiscing about summer nights or simply looking for a refreshing dessert, this pie is a delightful way to enjoy the flavors of a classic key lime pie without the sugar and carbs.

Why Make This Recipe?

This Keto Key Lime Pie isn’t just delicious; it’s also practical. Here are a few reasons why you should whip this up:

  • Easy and Quick to Make: With just a few simple steps, you can have a stunning dessert ready in no time.
  • Budget-Friendly: Utilizing common ingredients, this pie won’t break the bank.
  • Family Favorite: A hit with everyone, even those who aren’t on a keto diet, this pie is sure to please.

How to Make Keto Key Lime Pie

Ingredients

IngredientAmount
Almond flour1/4 cup
Butter, melted2 tablespoons
Granulated sweetener (like erythritol)2 tablespoons
Cream cheese, softened1/4 cup
Key lime juice1/4 cup
Sweetener (like erythritol)1/4 cup
Vanilla extract1 teaspoon
Salt1/4 teaspoon
Keto Key Lime Pie

Directions

  1. Preheat your oven to 350°F (175°C).
  2. In a small mixing bowl, combine the almond flour, melted butter, and sweetener. Mix until well combined.
  3. Press this mixture into the bottom of a small pie dish to create a crust.
  4. Bake the crust for about 10-12 minutes, or until it turns light golden brown.
  5. In another mixing bowl, beat together the softened cream cheese, key lime juice, sweetener, vanilla extract, and salt. Stir until the mixture is smooth and creamy.
  6. Once the crust is ready, pour the filling over it and spread it evenly.
  7. Bake the pie for another 10-15 minutes, just until it’s set but still slightly wobbly in the center.
  8. Allow it to cool, then refrigerate for at least 2 hours to let the flavors meld.
  9. Serve chilled and enjoy every tangy bite of your Keto Key Lime Pie!

How to Serve Keto Key Lime Pie

For the perfect presentation and enjoyment:

  • Serve with a dollop of whipped coconut cream on top for extra creaminess.
  • Pair with fresh berries like strawberries or blueberries for a burst of color and flavor.
  • Consider a refreshing mint tea or your favorite low-carb beverage to complement the zesty pie.

How to Store Keto Key Lime Pie

To keep your pie fresh:

  • Refrigeration: Store in an airtight container in the refrigerator where it can last up to a week.
  • Freezing: If you want to store it for longer, freeze slices in airtight containers. It can stay fresh for up to 3 months. Just let it thaw in the refrigerator before serving.
  • Reheating: This pie is best served cold, so no need to reheat!

Tips to Make Keto Key Lime Pie Perfectly

Achieve dessert perfection with these expert tips:

  • Enhance Flavor: Use fresh key limes for a brighter flavor; bottled juice can lack the zest.
  • Avoid Common Mistakes: Ensure the cream cheese is fully softened for a smoother filling.
  • Cooking Techniques: Don’t overbake! The pie should be slightly jiggly in the center when done, as it will firm up while chilling.
  • Serving Tip: Always serve cold to retain its refreshing taste.

Variations (If Any)

Need some alternatives? Here are a few variations you can try:

  • Vegan Version: Substitute the cream cheese for coconut cream and use a plant-based butter.
  • Gluten-Free Adaptation: This recipe is naturally gluten-free due to the almond flour.
  • Low-Carb Adjustments: Use a different low-carb sweetener like stevia or monk fruit for variation in sweetness.

Frequently Asked Questions (FAQ)

  • Can I make Keto Key Lime Pie ahead of time? Absolutely! This pie stores well in the refrigerator for up to a week or can be frozen for longer.
  • What are the best substitutes for almond flour? You can use coconut flour, but adjust the quantity as it’s more absorbent.
  • Can I cook this recipe in an air fryer? Yes, you can! Just set the air fryer to 325°F (160°C) and reduce the cooking time slightly.

Conclusion

Now that you have the perfect recipe for Keto Key Lime Pie, it’s time to don your apron and get started! With its tangy flavor and creamy texture, it’s a dessert that satisfies your cravings without the guilt. Don’t forget to share your creations! Leave a comment below to share your experience, rate the recipe, or post it on social media with your friends and family. Enjoy your slice of paradise!

Keto Lemon Cream Cheese Coffee Cake

Gooey Keto Turtle Brownies

If you’re searching for a delightful treat that perfectly balances indulgence and healthiness, look no further than this Keto Lemon Cream Cheese Coffee Cake. Picture this: a moist, fluffy cake bursting with zesty lemon flavor, all while being low in carbs—it’s a dream come true for keto enthusiasts!

Gooey Keto Turtle Brownies

This recipe isn’t just special for its taste; it holds a nostalgic place in my heart, as it reminds me of sunny afternoons spent with loved ones, savoring sweet treats and enjoying each other’s company. Whether served warm with a cup of coffee or chilled for a refreshing dessert, this cake is sure to impress!

The combination of creamy cream cheese and the bright notes of lemon creates a unique flavor profile that is both refreshing and indulgent. The use of almond and coconut flour ensures a soft and satisfying texture, while the erythritol gives just the right amount of sweetness. You won’t want to miss out on this treat!

Why Make This Recipe?

Here are a few compelling reasons why you should try making this Keto Lemon Cream Cheese Coffee Cake:

  • Easy and Quick to Make: With straightforward steps and simple ingredients, this recipe comes together in no time!
  • Budget-Friendly: These ingredients are generally affordable, ensuring you can whip up this delicious cake without breaking the bank.
  • Family Favorite: This cake is sure to be a hit with everyone, making it a perfect addition to family gatherings or casual brunches.
  • Healthy or Diet-Friendly: Low in carbs and sugar, this cake fits perfectly into a variety of diet plans, especially keto!

How to Make Keto Lemon Cream Cheese Coffee Cake

Here is a step-by-step guide to making this delicious coffee cake.

Ingredients:

For the cake batter:

  • 2 cups almond flour
  • ½ cup granulated erythritol (or keto-friendly sweetener)
  • 2 tsp baking powder
  • ¼ tsp salt
  • 3 large eggs
  • ¼ cup unsalted butter, melted
  • ¼ cup sour cream
  • Juice and zest of 1 medium lemon
  • 1 tsp vanilla extract

For the cream cheese filling:

  • 8 oz (225g) cream cheese, softened
  • ¼ cup powdered erythritol
  • 1 large egg
  • 1 tsp vanilla extract

For the crumb topping:

  • ½ cup almond flour
  • 3 tbsp granulated erythritol
  • 2 tbsp unsalted butter, softened
  • ½ tsp cinnamon

Directions:

  1. Preheat the oven to 350°F (175°C). Grease a 9-inch round cake pan or line with parchment paper.
  2. Prepare the cream cheese filling:
    • In a medium bowl, mix softened cream cheese, powdered erythritol, egg, and vanilla extract until smooth and creamy. Set aside.
  3. Make the cake batter:
    • In a large bowl, whisk together almond flour, erythritol, baking powder, and salt.
    • In another bowl, whisk eggs, melted butter, sour cream, lemon juice and zest, and vanilla extract.
    • Add wet ingredients to dry ingredients and mix until just combined.
  4. Assemble the cake:
    • Spread half the cake batter evenly in the prepared pan.
    • Carefully spread the cream cheese filling evenly over the batter.
    • Top with remaining cake batter, spreading evenly.
  5. Prepare crumb topping:
    • Combine almond flour, erythritol, cinnamon, and softened butter in a small bowl until crumbly.
    • Sprinkle crumb topping evenly over the cake.
  6. Bake:
    • Bake for 35-40 minutes, until golden brown and a toothpick inserted in the centre comes out clean.
  7. Cool:
    • Allow the cake to cool in the pan for 10 minutes, then transfer to a wire rack to cool completely before serving.
Gooey Keto Turtle Brownies

How to Serve Keto Lemon Cream Cheese Coffee Cake

To elevate your serving experience, here are some suggestions:

  • Pair it with Fresh Berries: A side of strawberries or blueberries complements this cake beautifully and adds a touch of color.
  • Drizzle with Sugar-Free Glaze: A simple sugar-free glaze made from erythritol and lemon juice can add an extra layer of sweetness.
  • Serve with Whipped Cream: A dollop of sugar-free whipped cream can enhance the richness of the coffee cake.

How to Store Keto Lemon Cream Cheese Coffee Cake

To preserve the freshness of your Keto Lemon Cream Cheese Coffee Cake:

  • Refrigeration: Store the cake in an airtight container in the fridge for up to a week.
  • Freezing: If you want to keep the cake for a longer duration, freeze slices in a freezer-safe bag for up to three months.
  • Reheating: Thaw in the refrigerator overnight and reheat in the microwave for a warm slice reminiscent of fresh baking.

Tips to Make Keto Lemon Cream Cheese Coffee Cake Perfectly

Follow these expert tips to ensure your cake turns out flawlessly:

  • Enhance Flavor: Adding a splash of lemon extract can intensify the lemon flavor.
  • Common Mistakes: Be careful not to overmix the batter; this can lead to a dense cake.
  • Cooking Techniques: Ensure the eggs are at room temperature for better mixing and texture.
  • Check for Doneness: Always check your cake a few minutes before the time is up to prevent overbaking; every oven is different.

Variations (If Any)

Want to switch things up? Here are some alternative versions:

  • Vegan Version: Substitute eggs with flax eggs and use a dairy-free cream cheese alternative.
  • Gluten-Free Adaptation: This recipe is already gluten-free, so you’re good to go!
  • Low-Carb Modifications: You can swap out the erythritol for other keto-friendly sweeteners like monk fruit.

Frequently Asked Questions (FAQ)

  1. Can I make Keto Lemon Cream Cheese Coffee Cake ahead of time? Yes! You can bake it in advance, and it stores well in the fridge or freezer.
  2. What are the best substitutes for coconut flour? You can use additional almond flour, but note that the texture may slightly vary.
  3. Can I cook this recipe in an air fryer? Absolutely! Just adjust the time and temperature according to your air fryer’s instructions.

Conclusion

In summary, the Keto Lemon Cream Cheese Coffee Cake is a delightful low-carb treat that’s easy to whip up, budget-friendly, and sure to please a crowd. I encourage you to try this recipe and share your experience! Don’t forget to leave a comment below and let us know how your cake turns out. If you loved it, rate the recipe and share it on your social media platforms. Happy baking!